

Think a small gap under your door is harmless? Think again.
That tiny opening lets cold air, dust, and bugs in and forces your heater to work harder.
A door sweep fixes that fast.
This guide breaks door sweep installation into seven simple steps so you can seal the bottom of your door in under an hour with a tape measure, a drill, and a few screws.
No fancy tools, no guesswork, just clear steps, common mistakes to avoid, and what “done” should look like.
Essential Steps in Installing a Door Sweep for Immediate Draft Reduction

A correctly installed door sweep seals the gap at the bottom of your door, stopping cold air, dust, moisture, and pests from getting in. When air sneaks through that gap, your heating or cooling system has to work harder and your energy bills climb. A tight seal means fewer drafts in winter and less hot air creeping in during summer.
Before you start, measure the gap under your door and the width of your door. You’ll need a tape measure and pencil. That’s it for measuring tools right now. Most doors are 30″, 32″, 34″, or 36″ wide, and sweeps come in standard lengths you’ll trim down. The gap you’re sealing usually sits between 1/16″ and 3/8″. A complete tool list shows up later, but for now just focus on understanding where the sweep will sit and how it’ll work.
Installation Steps:
-
Measure the gap under the closed door with a ruler or tape measure. Check if the gap stays even across the width or if it tapers.
-
Remove the old sweep by unscrewing it or carefully prying off adhesive backing. Clean the door bottom with isopropyl alcohol and let it dry completely.
-
Hold the new sweep in place. Use a clamp or putty knife to keep it level. Position it so the rubber or brush tail just touches the floor or threshold without dragging.
-
Mark pilot hole locations through the sweep holes. Start with the center hole, then mark holes roughly 1″ from each end.
-
Drill pilot holes using a 3/32″ bit for #6 screws or a 1/8″ bit for #8 screws. Keep the drill straight and stop when you feel the bit break through.
-
Drive the center screw first, leaving it slightly loose. Add screws at each end, then fill in remaining holes. Once all screws are started, tighten them snugly. Stop before the sweep bows or compresses.
After securing all fasteners, swing the door open and closed several times. It should move freely without the sweep dragging. If it binds, loosen the screws slightly, adjust the sweep down or tilt it, then retighten. Check for light or air leaking under the door by closing it and looking along the bottom from the other side.
Breaking Down Door Sweep Types and Choosing the Right One
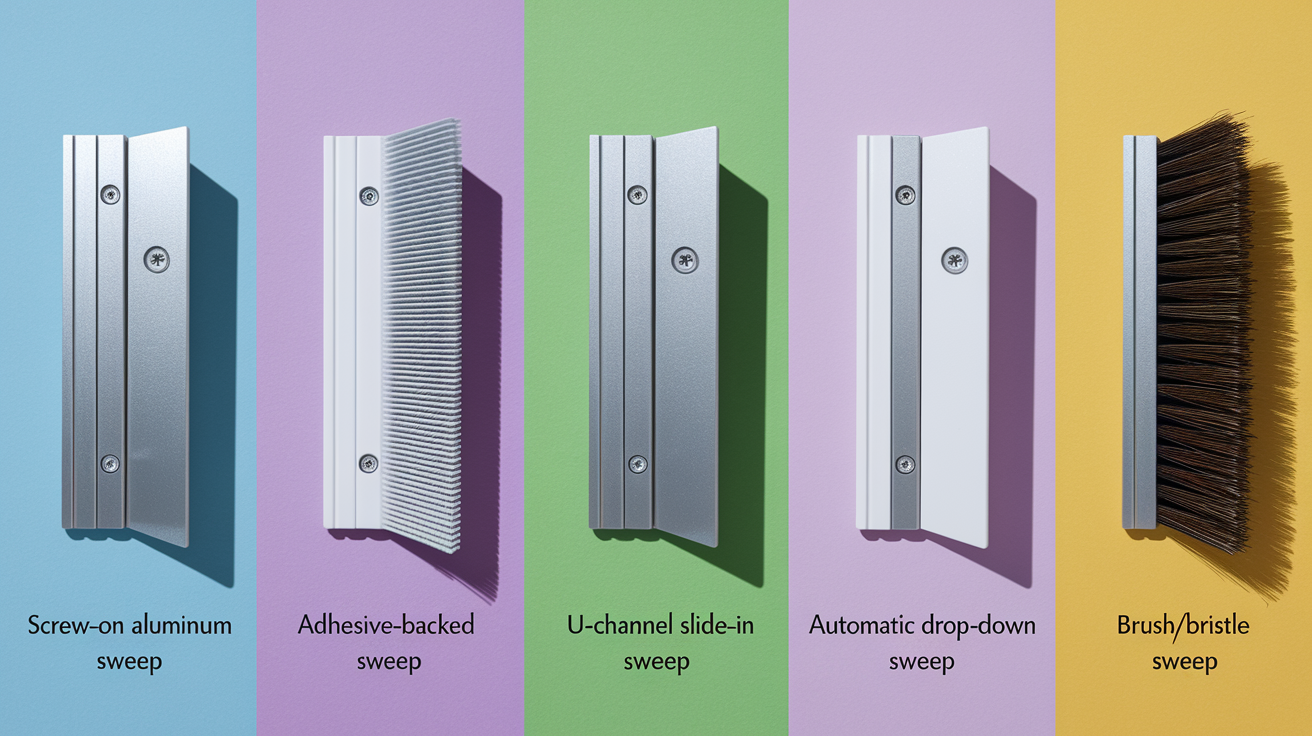
Door sweeps come in several materials and attachment styles. Picking the right one depends on your door material, the size of the gap, and whether you want a permanent or temporary fix. Aluminum sweeps with rubber or vinyl tails are the most common. They’re durable, easy to install with screws, and handle daily use well. Bristle sweeps use stiff brush strips instead of rubber and work well on uneven floors or over carpet.
Main Sweep Types:
Screw-on aluminum sweep: metal track with rubber or vinyl tail, fastens with screws through pre-drilled holes, durable and adjustable, typical cost $5 to $15.
Adhesive-backed sweep: vinyl or foam profile with sticky backing, quick install but less durable, costs $5 to $10.
U-channel or slide-in sweep: metal channel screws or glues to door, rubber insert slides into the channel, allows easy rubber replacement, costs $8 to $18.
Automatic drop-down sweep: spring-loaded mechanism that drops a seal bar when the door closes, no floor contact when open, premium option at $25 to $60.
Brush or bristle sweep: flexible brush fibers on metal or vinyl backing, flexible over uneven surfaces, costs $8 to $20.
For outdoor doors or high-traffic areas, choose aluminum or heavy-duty vinyl sweeps that can handle UV exposure, temperature swings, and frequent opening. Indoor doors or low-use exterior doors can use lighter adhesive or basic screw-on sweeps. If your threshold is carpeted or uneven, a bristle sweep or automatic drop-down works better than a rigid rubber tail. Budget sweeps under $10 usually last one to three years. Mid-range aluminum sweeps often last five years or more with minimal maintenance.
Tools and Materials Needed for a Smooth Door Sweep Installation

Gather everything before you start so you don’t have to stop mid-project to hunt for a drill bit or look for a pencil. Most of these tools are basic household items you probably already own.
You’ll use a Phillips screwdriver or a #2 driver bit in a drill to drive screws. A tape measure and pencil let you mark cut lines and pilot hole positions. For cutting the aluminum track, grab a hacksaw or metal snips. Either works, though a hacksaw gives you a straighter edge. Use a sharp utility knife to trim the rubber or vinyl tail. You’ll need a drill with a 3/32″ or 1/8″ bit to create pilot holes for screws. A small C-clamp or a second pair of hands helps hold the sweep in place while you mark and drill. After cutting metal, smooth rough edges with a coarse file. Finally, wear safety glasses whenever you’re cutting or drilling. Small metal shavings can fly up.
Tools and Materials List:
Door sweep (buy length equal to or longer than your door width: 30″, 32″, or 36″), Phillips screwdriver or #2 driver bit, tape measure, pencil or marker, hacksaw or metal snips, sharp utility knife, drill with 3/32″ or 1/8″ drill bit, small C-clamp or helper, coarse metal file, safety glasses.
Door sweeps usually come with screws included, typically #6 or #8 pan-head screws in 1/2″ to 1″ lengths. If your sweep didn’t include screws or you need extras, pick up a small box at the hardware store. Match the screw size to the pre-drilled holes in your sweep. For adhesive installs, check that the sweep has a peel-off backing or plan to buy 3M double-sided mounting tape separately.
How to Remove an Old Door Sweep Without Removing the Door

Removing the old sweep takes just a few minutes and doesn’t require taking the door off its hinges. Start by checking how the old sweep is attached. Look for screw heads on the door face or an adhesive edge along the bottom.
If the sweep is held with screws, back them out with a screwdriver and set the screws aside. The sweep should pull straight down and away from the door once all fasteners are removed. For adhesive sweeps, slide a putty knife or old credit card under one end and gently pry upward, working along the length until the adhesive releases. Go slowly to avoid gouging the door finish. Some older sweeps use small rivets instead of screws. If you see smooth round heads with no slot, you’ll need to drill them out with a bit slightly larger than the rivet shaft, then pull the sweep free.
Removal Steps:
-
Inspect the sweep and identify fasteners. Screws, adhesive, or rivets.
-
Remove screws with a screwdriver, or drill out rivets if present, keeping the drill straight.
-
Peel off adhesive sweeps by sliding a putty knife under the edge and lifting gently along the length.
-
Clean the door bottom with isopropyl alcohol on a rag to remove old adhesive residue, dirt, and oils. Let the surface dry completely before installing the new sweep.
After cleaning, run your hand along the door bottom to check for splinters, loose paint, or rough spots. Sand lightly if needed so the new sweep sits flat and adheres properly. If you’re switching from an adhesive sweep to a screw-on model, small holes left by the old adhesive won’t affect the new installation. The screws will hold securely regardless.
Door-Type-Specific Installation Variations for Wood, Metal, and Adhesive Sweeps

Most door sweeps install the same way, but wood doors, metal doors, and adhesive-backed sweeps each have small differences in how you fasten and position them. Knowing these variations before you start saves rework and frustration.
Wood Door Variations
Wood doors accept standard #6 or #8 wood screws easily, and pilot holes prevent splitting, especially near the door edges. Drill pilot holes at 3/32″ for #6 screws or 1/8″ for #8 screws, going about halfway through the door thickness. Solid wood doors hold screws firmly, so you can snug them down confidently. Hollow-core interior doors have a solid wood frame around the perimeter, so make sure your screws go into that frame and not the hollow center. Measure in about 1″ from each edge. If you accidentally hit the hollow section, back the screw out and move it closer to the edge.
Metal Door Variations
Metal exterior doors usually have a steel skin over a foam or honeycomb core, with reinforced areas where hardware normally mounts. Use #8 × 1/2″ self-tapping sheet-metal screws instead of wood screws. They have sharper threads and a drilling point that bites into steel. Pre-drill pilot holes with a metal bit (usually 1/8″) to prevent the screw from skating across the surface. Don’t over-tighten. Metal doors can dimple if you compress the skin. If your metal door has a built-in drip cap or threshold recess at the bottom, you may need a U-channel sweep that tucks into that space rather than screwing flat against the door face.
Adhesive-Backed Sweep Variations
Adhesive sweeps rely on surface prep more than mechanical sweeps do. Wipe the door bottom thoroughly with isopropyl alcohol and let it dry. Any dust, wax, or oil will cause the adhesive to peel. Measure and mark a centerline, then peel back just 2 to 3 inches of the adhesive liner at one end. Press that end into place, check alignment, then slowly peel and press along the door width, smoothing out air bubbles as you go. Most adhesive sweeps need 24 hours to reach full bond strength, so avoid slamming the door or testing the seal during that curing window. If your door sees heavy use or harsh weather, consider adding a few screws through the sweep into the door. Many adhesive sweeps have pre-punched holes for optional mechanical backup.
Cutting, Trimming, and Fitting the Door Sweep Correctly
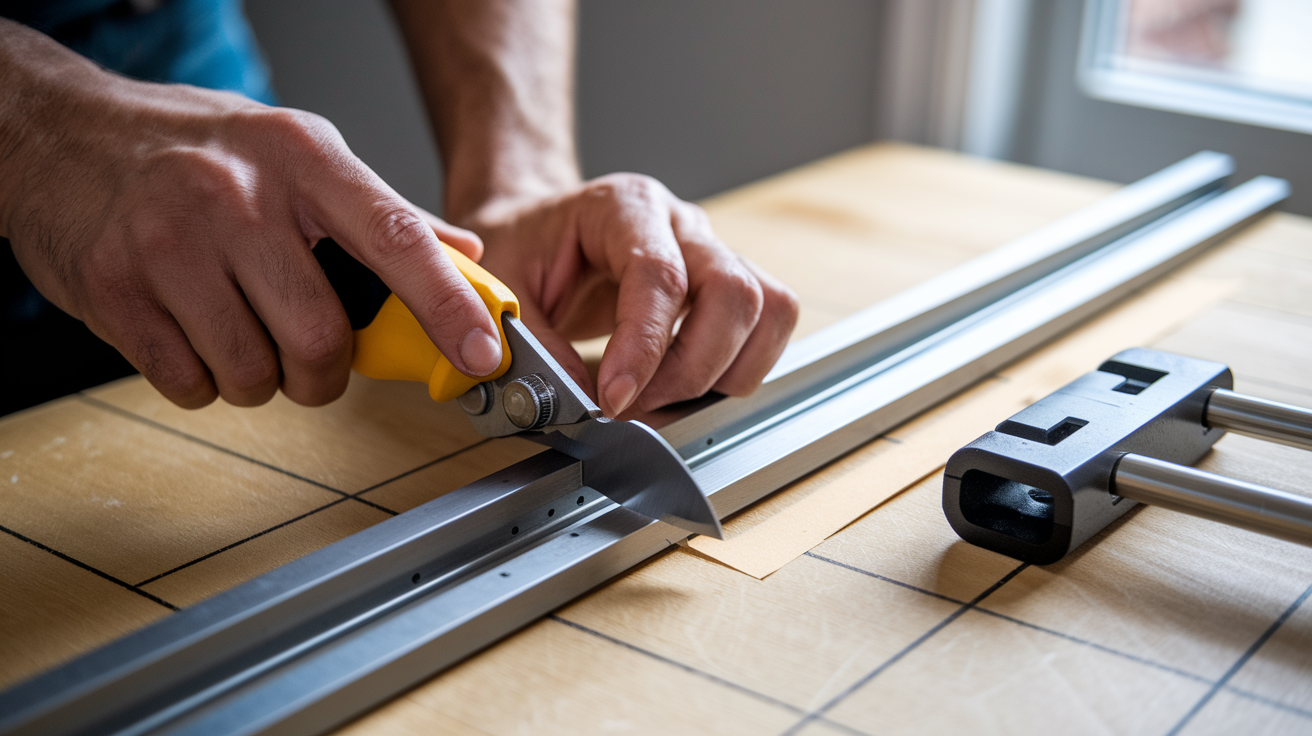
Almost every door sweep you buy will be longer than your door, so trimming is part of the job. Accurate cuts and clean edges make the difference between a professional-looking install and one that looks sloppy or binds against the door frame.
Measure your door width from the hinge-side edge to the outer edge where the door meets the frame. Write that number down. Most sweeps have a metal or plastic track (the part with screw holes) and a flexible rubber or vinyl tail (the part that seals the gap). You’ll cut both, but use different tools for each. For the metal or rigid plastic track, use a hacksaw with a fine-tooth blade or heavy-duty metal snips. Mark your cut line with a pencil, clamp the sweep to a workbench or sturdy surface, and cut straight across. After cutting, use a coarse file to smooth any burrs or sharp edges. This takes about 30 seconds and prevents cuts or snags during installation.
For the rubber or vinyl tail, lay the sweep flat and score the material with a sharp utility knife. Make three or four light passes along the same line rather than trying to cut through in one stroke. This keeps the cut straight and prevents tearing. If the tail is thick, you may need to fold it slightly and finish the cut from the back side. Once trimmed, test-fit the sweep against your door before you start drilling. You want about 1/8″ clearance from each door edge so the sweep doesn’t bind against the frame or weather stripping when the door closes.
Trimming Rules:
Cut the aluminum or plastic track 1/8″ to 1/4″ longer than your initial measurement, then file it flush if needed. Easier than cutting twice.
Trim the rubber or vinyl tail to match the track length, leaving 1/8″ clearance from each door edge.
Use multiple light passes with a utility knife instead of one deep cut to keep the line straight and avoid tearing.
Always deburr metal edges with a file. Sharp edges can catch on carpet, scratch thresholds, or cut your fingers during final adjustments.
If your door has an uneven gap (wider on one side than the other) you can usually adjust the sweep angle slightly during installation rather than trying to custom-trim the tail. Loosen the screws and tilt the sweep until the tail makes even contact across the width, then retighten.
Adjusting and Testing Your Newly Installed Door Sweep

Once the sweep is fastened, don’t walk away yet. You need to check door operation, seal contact, and make small tweaks if the fit isn’t perfect. These adjustments take just a minute or two but prevent callbacks to fix dragging, drafts, or squeaks.
Close the door slowly and watch how the sweep contacts the floor or threshold. The rubber or brush tail should lightly brush the surface without flattening or bending hard. If the door drags or sticks, the sweep is set too low. Loosen all the screws slightly, lift or tilt the sweep up by 1/16″ to 1/8″, and retighten. Open and close the door a few more times. Smooth, easy movement means you’ve got the height right. If you still feel resistance, loosen again and raise it another small increment.
Next, check for light leaks. Close the door and crouch down on the opposite side. If you see daylight or feel air moving under the door, the seal isn’t making full contact. This usually means the sweep is too high or the tail is trimmed too short. Lower the sweep by loosening screws and repositioning, or check that the tail extends past the door edge without binding. For gaps larger than 3/8″, a standard sweep may not reach. Consider a longer-tail model or adding a threshold riser to reduce the gap.
If the sweep squeaks or chatters when you open or close the door, the tail is dragging across a rough spot or sticking on the threshold. A thin bead of clear silicone along the contact area can reduce friction and noise, or you can sand the threshold lightly if it’s wood. Metal thresholds sometimes have sharp edges or raised seams. File those smooth to stop squeaking. On carpeted thresholds, sweeps will always make some noise, but switching to a bristle-style sweep usually helps because the brush fibers flex individually rather than dragging as one stiff edge.
Troubleshooting Door Sweep Problems and Avoiding Common Mistakes

Even straightforward installs can run into snags. Most issues come from rushing prep steps or skipping the test-and-adjust phase. Recognizing these problems early saves you from pulling the sweep off and starting over.
One common mistake is over-tightening screws. When you crank screws down too hard, the metal track bows or compresses, lifting the tail off the floor in the middle. The fix is simple. Back out each screw a quarter turn until the sweep lies flat again. Snug is enough. You don’t need gorilla strength. Another frequent error is cutting the sweep too short or trimming it unevenly. Measure twice before you cut, and if you’re uncertain, leave the sweep a bit long. You can always trim more, but you can’t add material back. Uneven trimming usually happens when you rush the utility knife cut on the rubber tail. Take your time with multiple light passes.
Dirty surfaces are the main reason adhesive sweeps fail within the first few days. If you skipped cleaning the door bottom with alcohol, or if you installed the sweep on a dusty or oily surface, the bond won’t hold. Peel the sweep off, clean thoroughly, and switch to mechanical fasteners (screws) if the adhesive has already lost its stick. For screw-on sweeps that wiggle or pull loose, check that you drilled pilot holes. Skipping this step in hardwood or metal doors can strip screws or crack the door edge. If a screw is already stripped, move the hole 1/2″ to the side and re-drill.
Common Issues and Fixes:
Door drags or binds: loosen screws, raise sweep by 1/16″ to 1/8″, retighten and test again.
Draft or light visible under door: lower sweep or check that tail isn’t trimmed too short. For gaps over 3/8″, consider a longer-tail sweep or threshold adjustment.
Sweep squeaks or chatters: apply thin silicone bead to contact area, sand rough threshold spots, or switch to bristle sweep for carpeted floors.
Adhesive fails within 24 to 48 hours: surface wasn’t clean or dry. Remove sweep, clean with isopropyl alcohol, and use screws instead of relying on adhesive alone.
Screws strip or won’t hold: pilot holes missing or wrong size. Drill new pilot holes 1/2″ away and use slightly larger screws, or add a wood filler plug and re-drill.
Sweep bows or won’t sit flat: screws over-tightened. Back each screw out slightly until track straightens and tail contacts evenly.
If you installed the sweep and later notice drafts along the door edges rather than the bottom, the problem isn’t the sweep. It’s the side weather stripping or a gap at the top. You can add adhesive foam strips at the door corners where the sweep meets the side jamb to close those transition gaps.
Time, Difficulty, and Cost Expectations for Door Sweep Installation

Most homeowners finish a single door sweep install in 15 to 45 minutes, depending on whether you need to trim the sweep, drill pilot holes, or adjust the fit. If you’re installing an adhesive sweep and skipping screws, plan for 10 to 20 minutes of active work plus a 24-hour wait for the adhesive to cure fully before you use the door normally. First-timers usually land closer to the 45-minute mark. Once you’ve done one door, the next ones go faster because you’ve already figured out your measuring and drilling routine.
Difficulty falls in the Easy to Moderate range for most DIYers. If you’re comfortable using a drill, measuring accurately, and cutting metal or rubber with basic hand tools, you’ll handle this project without trouble. The trickiest part is getting the sweep height right so the door doesn’t drag but the seal still makes contact. Expect to loosen and adjust screws at least once during your first install. Standard consumer-grade sweeps cost between $5 and $25 each, with basic vinyl or adhesive models at the low end and aluminum or heavy-duty rubber sweeps in the $12 to $18 range. Automatic drop-down sweeps, which are spring-loaded and drop a seal bar when the door closes, run $25 to $60 and take a bit more care to install because of the moving mechanism. Add another $5 to $10 if you need to buy screws, drill bits, or a hacksaw blade separately. Most sweeps include screws, but it’s worth checking the package before you leave the store.
Final Words
Measure the gap, trim the sweep to fit, and secure it so the door swings cleanly. That’s the fast way to stop drafts and save energy.
Proper measurements, about 1/16″ to 3/8″ clearance, and tidy trimming make the job quick and tidy. Follow the steps: measure, remove the old sweep, clamp and mark, drill pilot holes, secure with screws, then test and tweak. Most installs take 15-45 minutes and feel doable.
Use this door sweep installation guide as your checklist. You’ll notice less draft and a small but real win for your home.
FAQ
Q: What is the correct way to install a door sweep?
A: The correct way to install a door sweep is to measure and trim the sweep to fit, clamp it, mark and drill pilot holes (3/32″ or 1/8″), then fasten with #6 or #8 screws for an even seal.
Q: Do you install a door sweep on the inside or outside?
A: A door sweep is normally installed on the inside bottom edge so the seal faces the interior, stays protected from weather, and is easier to replace; exterior fits are mainly for garages or heavy-duty doors.
Q: Do I need to predrill holes in metal door for door sweep screws?
A: You should predrill pilot holes in metal doors using a 3/32″ or 1/8″ bit, or use #8 self-tapping screws; always wear eye protection and support the sweep while drilling.
Q: Should a door sweep touch the threshold?
A: A door sweep should lightly touch or compress about 1/16″–3/8″ against the threshold depending on sweep type; adjust so it seals evenly without dragging during the door swing.